Cellar Keeper Types and Brands
Read the label top to bottom — but route bottles by wine type first.
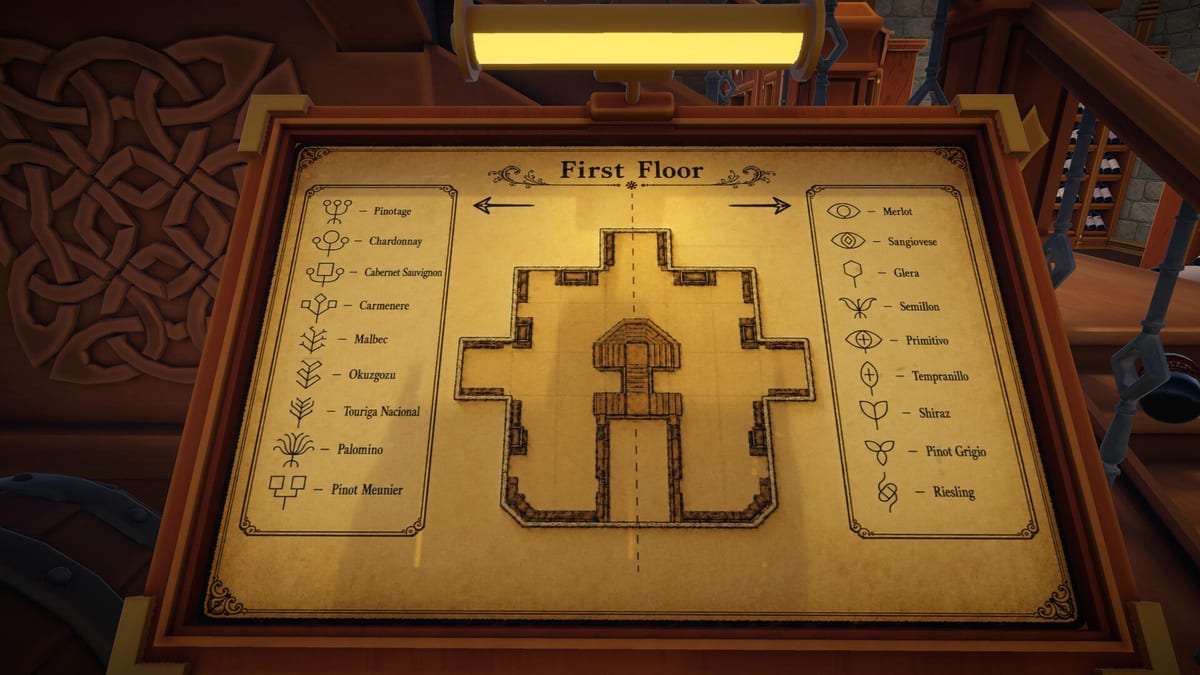
Every bottle in Cellar Keeper carries a three-line label: brand on the first line, wine type on the second, and series number on the third. New keepers often assume brand is the master key because it is listed first. That instinct costs time. Wine type is what the central map and cabinet symbols use to route bottles across the cellar; brand matters most when you are standing in front of a specific cabinet deciding which shelf should hold a bottle you already know belongs in that room.
EgoTrampoline built a cozy organizing sim around pattern recognition, not memorizing 2,448 unique items. Once you internalize the hierarchy — variety first, brand second, series third — the marathon of sorting every bottle in the August 6, 2026 Steam release feels manageable instead of overwhelming.
The three label lines explained
Brand identifies the producer or label family. Two bottles can share a brand but differ in wine type or series. When you batch pickups, keeping brands separate in your carry list prevents shelf lock-in mistakes later.
Wine type is the variety or category line — the word the map symbols reference. When you open the central map, each cabinet icon corresponds to a wine type destination. Carry a bottle to the room whose symbols match its second line before worrying about which shelf inside the cabinet should receive it.
Series number is the numeric identifier within a brand line. It controls ordering within a brand once the correct wine type cabinet and brand shelf are established. For a dedicated breakdown, see Series Numbers.
Why wine type beats brand for routing
Imagine picking up ten bottles near the cellar entrance. Some share brands; others do not. If you sort purely by brand in your head, you might walk to a cabinet that accepts Brand A while those bottles actually require three different wine types in three different wings.
The efficient loop looks like this:
- Glance at the wine type line on each bottle.
- Check the central map for the matching cabinet symbol.
- Walk to that cabinet with only bottles sharing that wine type in your carry slots.
- Inside the cabinet, group by brand and choose shelves carefully.
This workflow pairs directly with Cabinet Symbols and the broader Cellar Layout guide. Map literacy cuts cross-cellar trips in half before any skill upgrade enters the picture.
Brand and shelf lock-in
Once you reach the correct cabinet for a wine type, brand determines shelf ownership. The first bottle you place on an empty shelf claims that shelf for its brand. Subsequent bottles of the same brand can join it; bottles from other brands belong on a different shelf in the same cabinet, even if the wine type matches.
Shelf lock-in is the most common mid-game mistake. Players see yellow feedback on wine type and assume any shelf in the cabinet works. Gray flashes appear when brand rules conflict. Fix mismatches early — partial shelves with wrong brands block clean completion and slow skill point gains in Cozy Mode.
Full placement feedback rules live in Sorting Rules. Yellow means correct; gray means wrong placement, wrong shelf, or wrong cabinet.
Reading labels under pressure
Cozy Mode gives you time to read every line. Speedrun Mode removes upgrades and rewards fast pattern recall — you still route by wine type first, but muscle memory matters more. Hardcore Mode adds consequence for sloppy handling; misreads that send you to the wrong wing waste more than seconds.
Skills help but do not replace label literacy. Spot Matches highlights compatible bottles nearby, and Batch Grab expands how many bottles you can pull at once, yet both assume you already know why wine type leads routing. See the Skills hub for upgrade priority.
Quick Order and Target Hint accelerate decision-making once types and brands are familiar. Auto Place assists with shelf confirmation but will not fix a wrong cabinet trip.
Practical sorting sessions
When you enter a cluttered room, scan wine types before brands. Pick up to ten bottles (your carry maximum) that share one wine type, deliver them to the mapped cabinet, then subdivide by brand on arrival. If a shelf is empty, decide deliberately which brand will own it — the first placement sticks.
Cross-link this habit with How to Organize Bottles from the Guides hub. That walkthrough uses the same type-first logic with room-by-room examples.
Common questions keepers ask
Can two brands share a shelf? No. The first brand placed owns the shelf until you clear it or reorganize according to game rules.
Do all bottles of one brand go to one cabinet? Not necessarily. Brand groups within a wine type cabinet, but different wine types from the same brand route to different map symbols.
Where do series numbers fit? After type and brand are correct. Read Series Numbers before fine-sorting large brand collections.
Related pages
Return to the Bottles hub for the full section index. Map readers should open Cabinet Symbols. Mode-specific pacing is covered in Cozy Mode and Speedrun Mode on the Modes hub. For achievement hunting after labels click, visit Achievements or the Review overview. The Wiki home links every hub if you prefer browsing top-down.
Frequently Asked Questions
Quick answers to the most common questions.
Which label line matters most for finding the right cabinet?
**Wine type** (the second line) matches cabinet symbols on the central map. Brand matters after you arrive at the correct wine type room.
What happens when I put the wrong brand on a shelf first?
That shelf locks to the first brand placed. Other brands need a different shelf in the same cabinet even if the wine type is correct.
Are brand and wine type ever the same text?
They are separate fields on every label. Always read both lines — similar wording does not mean they route to the same place.
How do skills interact with label reading?
[Spot Matches](/skills/spot-matches/) and [Batch Grab](/skills/batch-grab/) speed collection but still rely on wine type routing. Unlock them in Cozy Mode via the [Skills hub](/skills/).